Wednesday, December 30, 2015

Autodesk Memento - Cellphone Photogrammetry Experiment

One of the most important things in our world, today, is data. Being able to leverage data for efficiency in the field, client turnover, and documentation for future reference by our service department. I began thinking back to a post that I wrote earlier in September about Memento and how I leveraged images to recapture the google earth terrain (influenced from Arne Bjelland), and decided I would try to accomplish the same thing, but with images from one of our completed systems. So I took eighteen photographs, emailed them to myself, and then processed them through memento. Here are the results:

Boiler Board


Run #1: 18 Cellphone Images

Run #1: Processing Time about Five Minutes


Once this file has been loaded into Memento. Memento can then export this file as a .rcp file. This opens up in Autodesk's ReCap software and allows the user to tag with notes and document in recap for future reference. The user can save the file as a point cloud. In turn the user can import the point cloud to Revit for future reference. It's important to note that prior to loading to ReCap you will want to use the scaling tool in Memento to reference two points and to give it a dimension. This will scale the file accordingly and allow the file to be view-able in a point cloud format. After scaling it accordingly you can load it into ReCap.

Point Cloud that can be notated. These notes support attachments (at this point in time only images) and hyperlinks. Hopefully in the future they will allow pdf specifications.


Example of notations in edit mode. The preview box is much more eye friendly and doesn't obstruct the point cloud as bad.
After you've documented the image, or while someone else is documenting this point cloud in your office, you can import the point cloud into Revit and use it for referencing the pipe locations and equipment placement. We're intending on reverse engineering our prefabricated assemblies this way.

Section of the Point Cloud loaded into Revit and scaled accordingly for tracing/placing pipe and equipment.
3D Revit View (AutoCAD Underlays for placement and coordination of point cloud positioning)
The workflow will be something like this:

1.) Assemble the prefab assemblies in the warehouse.
2.) Scan the assemblies. (Take pictures of them)
3.) Process them with Memento.
4.) Scale the file in Memento.
5.) Export to .rcp
6.) Open in ReCap
7.) Note the equipment with installation manuals.
8.) Import the point cloud in Revit and build the assembly referencing the scanned images.

What's next?

Placing the equipment of course!

We create our Revit families and document them in Unifi. This allows us to reference specification data through the cloud and to ensure everyone is using the appropriate families.
We are able to log all of our families through Unifi, and as we complete a family we can upload it to Unifi, where it then becomes usable by everyone in the office. This family contains all the documentation and information that can then be referenced in our schedules accordingly.

Revit model referencing the cellphone image.
You can add additional images to clean up the 3D model that is generated. I will be uploading some samples of these in the future.


Friday, December 11, 2015

Dynamo - Folder Creation Module

The other day I was looking at ways to mass produce folders and now here you have a spreadsheet of values that create a series of folders! I'm aware this is also achievable through an excel macro, but I thought I would share Dynamo in a folder structure creation module! In this particular example I'm strictly referencing an excel spreadsheet and mapping each row to an initial directory specifier. The module cycles through each row and in turn creates a list of folders in the location!

You can also tie in additional columns to the the rows so that it feeds the description; however, it's important to note that in this case there are special characters in my excel list that will throw some errors in the folder structure without some error handling/exceptions.
Mass Folder Creation with Dynamo!

Friday, December 4, 2015

Dynamo - Specification File Writer/Specbook Writer

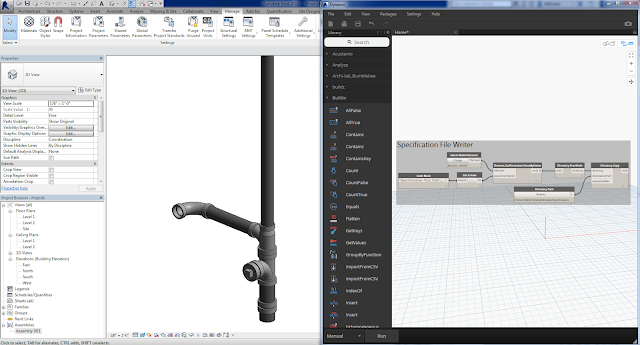
So after getting back from Autodesk University in Vegas this year I've been thinking a lot about data. What can I do to simplify some of our workflows, and how can I get our prefabrication assemblies to run the smoothest at Harvey's Plumbing and Heating. I was thinking about it all day and I finally came to a conclusion. "DYNAMO! I found it!"... sorry for the horrible pun... anyways I've decided I will embed file location paths from our network to our family files and write a script that can copy the files to and from a file location. This is fantastic because now all we have to do to get the information to the trades in the field is to simply place the families, and with all this amazing data to be able to send it seamlessly to the cloud! Here's the module. I intend to obviously add more to this, but for now it works perfectly from taking Revit Family files data paths and copying the placed nodes files to and from folder locations. PERFECT for ease of data transferring and folder creation in a360 Team.


Saturday, November 28, 2015

Architecture 456 - Downtown Bozeman Hybrid

Attached are the final boards to my final undergraduate architecture studio course at Montana State University in Bozeman, Montana. On to graduate school after this! I hope you enjoy the renderings! I was able to integrate the Revit -> Dynamo -> Lumion for a successful presentation. The abilities you have to manipulate designs with dynamo are incredible! I intend to follow up to this post with how I achieved the final design with the ski ramp's helical facade.  


Friday, November 20, 2015

Dynamo - Elk for DynamoBIM by Timothy Logan

I happened to be scrolling through the dynamo package manager and stumbled upon Timothy Logan's Elk Package for Dynamo. I've had some familiarity with Elk in the past with Grasshopper and in prior years of architecture school, and it's great package for integrating all your OSM and Topography data into Dynamo. Go download it on the package manager and give Timothy Logan some thanks for an excellent share! Truly another great example of how powerful the Dynamo community is!


Elk 1.0.0

Thank you to Timothy Logan for making Elk available to Dynamo users!

Here are his two videos for how to use the OSM data and Topographical data.


Elk for Dynamo - OSM from Timothy Logan on Vimeo.


Elk for Dynamo - Topography from Timothy Logan on Vimeo.

Some of the links referenced in the above videos:

https://www.openstreetmap.org/
http://dds.cr.usgs.gov/srtm/version2_1/
http://earthexplorer.usgs.gov/
http://www.opentopography.org/


Thursday, November 19, 2015

Autodesk University 2015: Business Card Management for Dummies!


It's been a pretty universal topic across the interwebs that if you're attending Autodesk University you had better bring a bunch of business cards! Having attended these conferences I'm aware that I need to make space in my travel bag for a bunch of cards. Generally this isn't a problem, the problem exists when you get back to the office and you have to dig through all these cards to connect with someone, and have a hard time sifting through the pile of madness. The following is my new process for organizing and managing all the business cards, so I don't risk being unable to contact someone later in the future! I'm sure there are other fantastic ways to manage this, but this is just one of the many ways that works best for me!

You will need a Microsoft 365 Account. As a student I have a free account, and am able to utilize this service; however, this option will not be available if you don't already subscribe. There are other applications through the web you can search for to manage this, but this process seems to work best for me! I can still bring the cards back and put them in my drawer, but the benefit to this process is that the contacts will be stored as soon as I capture the card and download the .vcf on my desktop!

1. Download Microsoft Lens

2. Take a picture of your business card.

3.) Automatically adjusts to fit the card to the screen.

4.) Choose your OneNote (Contact + Image) option.

5.) Name the person's card.

6.) List of contacts for easy access in the future. If you click the organization button next to the edit button it will display an image of the business cards as well.

7.) The interface appearance on One Notes Website

8.) Downloading the contact information to your outlook account.
9.) Open this file
10.) All the cards information is autofilled, and there is no typing necessary. The process literally takes seconds per card!


Wednesday, November 4, 2015

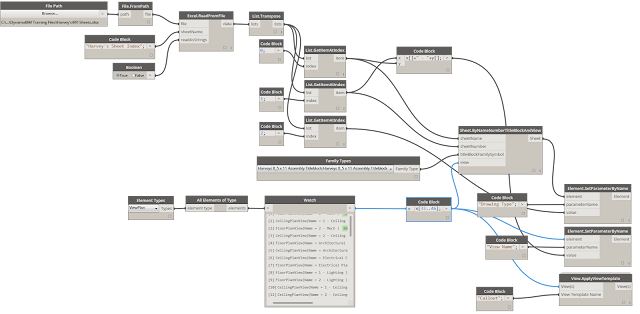
Dynamo - RFI Sheet Generator Module Update

Previously I hadn't found the solution for being able to select all of the callout views in a particular file. Well thanks to JimmyG on the DynamoBIM community forums for sharing this image with me.

I was able to filter out the initial manual entry mode that I had, and replaced it with this bit to get it to work flawlessly. Now I can simply click run once I've completed the original series of steps and it will generate my RFI Sheets for me. Here's the color coded, new and improved, RFI Sheet Generator Module all thanks to the DynamoBIM Community!


The Run Results:

The Spreadsheet


Views added to Sheets and Named Accordingly.
The original conversation and posts on the DynamoBIM Community Forms can be viewed here:

Sunday, November 1, 2015

Autodesk 360 Rendering Pro of the Week Article - January 2015

01/08/2015

Friday, October 30, 2015

Dynamo - Space Planning DynamoBIM Community Collaboration

Thanks to Kyle C. Martin for initially sharing his post on the DynamoBIM blog about Space Planning and using Dynamo for task automation, and collaborating with me about his process! I have successfully laid out a similar script that allows myself to input programmatic data into my excel spreadsheet. I followed through his process and made some refinements on my end to simplify some his programming with other modules that might perform the same way. When all was said and done, and after a weekend of wading through some examples and thoughts about how it all should go together, I had some success re-engineering this fantastic module! This is going to help me illustrate the data of my program to the faculty at my school, and better illustrate some design intent. I am very grateful for the Dynamo Community, and for having professionals in the industry that are willing to take time out of their busy lifestyles to collaborate and bounce ideas off of!


You can read more about Kyle C. Martin and some of his workflows here:
http://www.martinportfolio.com/blog/

Kyle was kind enough to make me work through the process on my own, and shared tips, hints and tricks along the way. Definitely worth exploring some of his thoughts and how he uses DynamoBIM in his professional workflows. It is important to note that Kyle did not share the Dynamo Module with me, and allowed me to figure it out on my own through trial and error and professional feedback. Thank you  again Kyle for challenging me!

The Dynamo Primer is now open-source and is more informative than ever. This is what has helped me learn how to use Dynamo in our office at Harvey's Plumbing and Heating in Bozeman, Montana.

Check out the Dynamo Primer here!:
http://dynamoprimer.com/

Check out the Dynamo Community forums here:
http://dynamobim.com/forums/forum/dyn/

I would also like to thank Julien Benoit for helping us out with the assembly creation modules we've made here in the office! It is important to understand that the Dynamo Community has a plethora of people that are there to help with any problems you may be having with your Dynamo learning endeavors and that people are there more than willing to help you learn and to learn together!


The Revit Saver's Screencast Group Update


New Contact Form for invites to the The Revit Saver's Screencast group!
Please provide your email address in the message,
a question to a problem you may be having,
and I will send you a group invite and answer your questions!

For anyone interested in asking questions and learning more about Revit functionality, I have opened up a screencast group for therevitsaver.blogspot.com. You are more than welcome to send me a message through the blog form, on the right hand side of the site, for an invite. The beauty is that I will be able to answer any burning questions that you can't get answered, or be able to point you in the right direction for something that might be a little bit more helpful! Chances are if you're asking a question... someone else has already asked the same one! I look forward to seeing you all on therevitsaver's screencast group page!

Autodesk Screencast

The Revit Saver's Autodesk University 2015 Schedule

Since I look forward to seeing my friends and colleagues at the event I figured I would share my schedule for Autodesk University 2015! I look forward to collaborating and reconnecting with everyone, and meeting new connections as well! I'm pursuing the fabrication track again this year, and it will be nice to see the second year and how much further along we've progressed since last year! Please let me know if you would like to catch up and talk for a bit. I've added a new contact form on the blog for people to get quickly in contact with me, as well as for any Revit/Fabrication questions you may have!


Thursday, October 29, 2015

Dynamo - Sage Database Excel Parameter Mapping Part Numbers and Cost Module

For some time now we have been coordinating our database of parts in Revit to match our database inventory in Sage 100 Contractor. Well today, I am proud to announce, we have figured it out! All with a simple Dynamo script. The process is simple! We tied a description to all of our parts from Sage to all of our Revit families. We then use Dynamo to use these "Key Families" to parameter map the descriptions of an excel spreadsheet to the prospective "Key Family" in the revit model. This allows us to pull the pricing data in at the end of each job, accurate pricing based on updated excel spreadsheets to our server, and in turn handing off accurate spool drawings with pricing to aid in our initial estimation and fabrication stage. Attached below is the current script and an example of the excel spreadsheet we are using to fuel this data to the parts! Enjoy!


Sage Database Parameter Mapping Part Numbers and Cost Module


Excel Spreadsheet of Data from Sage 100 Contractor

The Model Space Example
The Parameters that are overridden from the Dynamo definition.
Ordering Schedule for Hand off to Shop Manager

Thursday, October 22, 2015

Revit 2016 R2 (Sunrise) 10-22-2015 Released!


Revit Sunrise has been released!!!


  • Global parameters: Global parameters bring the power of parametric families into the project environment to better capture design intent. You can create global parameters that are specific to a single project file but that are not assigned to categories. Use global parameters to drive the value of a dimension or a constraint, associate to an element instance property to drive its value, or report the value of a dimension, so the value can be used in the equations of other global parameters.
  • Cancel print/export: When you print or export multiple views and sheets, click Cancel to cancel the entire operation. In earlier releases, the Cancel button allowed you to cancel only one view or sheet at a time. Now the Cancel button cancels the print jobs or export operations of all selected views and sheets.
  • Performance:
    • Occlusion culling: To improve performance and reduce the amount of time required to open views, the Graphics tab of the Options dialog offers a new setting: Draw visible elements only. This setting is enabled by default. Performance improvements are most noticeable for 3D views that contain many obscured elements.
    • Export to DWF/DWFx: To significantly reduce processing time when exporting views/sheets to multiple DWF or DWFx files, the software now uses several RevitWorker processes.  This capability especially benefits users who want to upload their models to Autodesk® A360 for use with Collaboration for Revit or BIM 360 Glue.
    • Color fills: To improve performance, color fills are completed as a background process so you can continue working in the model while the views update.
    • Background processes: To see a list of the Revit processes that are running in the background, use the status bar.
  • Family Editor:
    • Family visibility preview: In the Family Editor, you can view improved representations of family geometry with respect to levels of detail, visibility parameter settings, and view type. Create, test and edit the geometry of a family without having to repeatedly load it into a project.
    • Filter voids and solids: You can specifically isolate void and solid geometry when using the Filter tool in the Family Editor.
  • Revisions: Additional information is available for revisions to make it easier to see exactly how the revision number will be generated, and to select revisions to include in a revision schedule.
    • Sheet Issues/Revisions dialog: When Numbering is set to Per Project, a new Revision Number column displays the actual revision number that will be generated based on the Sequence, Numbering scheme, and Numbering options. This column does not display if Numbering is set to Per Sheet.
    • Revisions on Sheet dialog: A Revision column now displays the revision sequence information along with the revision description. A new Date column displays the revision date.
  • Revit links: These changes improve workflow and productivity when using Revit links in the host model.
    • A new positioning option, Auto - Project Base Point to Project Base Point, is available when inserting Revit links. This option positions the linked file using the model's Project Base Point as the insertion point, and aligns it to the Project Base Point in the host model.
    • Two options are available to reposition a Revit link after it has been inserted: Reposition to Project Base Point, and Reposition to Internal Origin.
    • When you are working in a local copy of a workshared model, the Unload command offers 2 options:
      • Unload For all users: The Revit link is unloaded for all users in the model (existing behavior).
      • Unload For me: The Revit link is unloaded for the current user only. This command works like a permanent override and remains set for the current user for that RVT link until it is cleared. This option allows you to unload and keep Revit links unloaded for portions of the model you aren't working on without affecting other team members. Unloading Revit links may also increase performance and memory usage.  To clear the override, right-click the link name in the Project Browser, and click Unload Clear my override.
  • Worksharing: When you are opening a workshared model and you select the Detach from Central option, the default name of the open model is now the original model name with "_detached" appended (instead of a blank file name). When saving the model, you can specify a name or use the default.
  • View range: The View Range dialog has been improved to provide visual descriptions of view range terminology, making it easier for you to set the view range.
  • Underlay: The Underlay properties have been improved to more clearly define what they do. A new grouping in the Properties palette, Underlay, contains the properties used to set an underlay range. The Underlay parameter is renamed to Range: Base Level. A new read-only parameter Range: Top Level displays the next level above the Range: Base Level. The options for Underlay Orientation are changed from Reflected Ceiling Plan to Look Up, and from Plan to Look Down.
  • Filters dialog: The Filters dialog has been improved to make it easier to find specific filters in the list. Filters are listed alphabetically and sorted in a tree structure with headings for rule-based and selection-based filters.
  • Perspective views: Additional modeling capabilities are now available in perspective views.
    • Modify panel (Copy)
    • Clipboard panelPaste drop-down (Paste from Clipboard), and any available tool from the drop-down
  • Spot slope: You can now place a spot slope annotation in a linked model.
  • Wall joins:
    • When placing walls, you can allow or disallow wall joins with the Join Status option.
    • You can select multiple wall joins and change the configuration of all selected joins to Butt, Miter, or Square Off.
  • Display of walls: To improve performance so that views open and update faster, Revit regenerates walls only for what is visible on the screen. In addition, if a wall appears very small on the screen, it is displayed as simplified lines, regardless of the detail level assigned to the view.
  • Railings: When you edit the Type properties of a railing, you can now use the Preview pane of the dialog to view your changes.
  • Autodesk Raytracer rendering: Define a custom render quality to specify light and material accuracy, and render duration options.
  • Energy Analysis:
    • Advanced thermal zoning: Revit now offers automatic thermal zoning that uses advanced algorithms, resulting in more accurate energy simulations without additional modeling.
    • On the ribbon, the Enable Energy Model tool has been renamed to Create Energy Model. Use this tool to create the energy analytical model and display it within the context of Revit. (When an energy model exists, the tool changes to Delete Energy Model.)
    • The accuracy and appearance of analytical surfaces has been improved. Edges are less pixilated, and surfaces are more accurate and less faceted. As a result, the energy analytical model is more accurate, looks better, and generates a smaller XML file.
  • Electrical settings: You can specify a default rating to use for creating circuits in a model.
  • Assigning a distribution system: If there is only one distribution system applicable to an equipment instance, the distribution system is now assigned automatically.
  • Display of ducts: To improve performance so that views open and update faster, Revit regenerates ductwork only for what is visible on the screen. In addition, if duct appears very small on the screen, it is displayed as simplified lines, regardless of the detail level assigned to the view.

Sunday, October 18, 2015

The Revit Saver's October 2015 Add-in Update Review for Unifi v1.8!

For the past month or so I've been doing product updates and addin overviews of programs that have aided me throughout work and school. I know I've mentioned Unifi over and over and over again, and I will continue to, because until you've tried it you haven't lived. The following are V1.8's release notes pulled from Unifi's website. http://blog.discoverunifi.com/v1-8-release-notes/. The team has given Unifi a fantastic face lift, and it is even FASTER than before. Every release it gets faster and faster... hence every release has "Added several stability enhancements". These stability enhancements are no joke. Each stability enhancement has translated to $ in our pocket making that nineteen dollar a month price tag, per seat, pay for itself in increased efficiency in the office. For being in charge of our Revit content library this has made the time spent managing and updating content exponentially smaller. It used to be dreaded now it is complete joy to see our content library not only grow, but increase our productivity.

V1.8 RELEASE NOTESPOSTED IN NEWSRELEASE NOTESWe are very happy to announce the release of Unifi v1.8. Highlighted in this release is the beginning of our graphic styling project including new colors, logo, and several UI/UX enhancements to make your experience using Unifi more enjoyable and streamline your efficiency!
A new Ideas portal is now live and open to all customers! Your ideas matter, login and start submitting your ideas directly to the Unifi team today. You can vote on other peoples ideas and let the Unifi team know what YOU want us to build next! To top it off a brand new Unfii website has been launched, check it out!
New Login Screen
New Unifi Login Screen
New Features:
  • New logos, color palette, and branding graphics have been updated across the Unifi application.
  • Admins can now edit the Library of a Content Request! (Thanks Fergus!)
  • Type Catalogs now display sorted exactly the same way as Revit does. Previously it was sorted per type name by default. (Thanks Ryan!)
  • New User Information button added to the top header bar of Unifi. This will show the currently logged in user and allow them to logout. More features will be added to this button very soon!
  • Dates displayed across the Unifi application have been set to the users local date/time format. (Localization of Data/Time)
  • Added several stability enhancements
Exterminated Bugs:
  • Fixed the Unifi installer to now show the current Unifi version in the Windows Add/Remove programs dialog. Previously it was stuck on v1.6..for some silly reason.
  • Fixed an issue where if a library was removed from an existing saved search the user or admin was never alerted of this. If this scenario happens Unifi will now display a human readable error message.
  • If a user was once part of a User group then removed, they would still have access to that User Groups permissions. We have fixed this so Unifi Admins across the world can now stop pulling their hair out.
  • Fixed an issue where in some cases newly uploaded content would not immediately be shown in searches and browsing.
  • Fixed an issue where some content requests where not showing up for Company Admins. This annoying behavior has been resolved.
  • Fixed an edge case of company saved searches not appearing once all libraries in a company were deleted. This would never happen in reality, but hey we fixed it anyway.
  • Fixed an issue where the sorting options for a saved search were not working. Whats the point of sorting if it doesn’t work?

We truly hope you enjoy this release. Thank you to all our great customers who share our vision of organizing, analyzing, and distributing the worlds BIM data!!The Unifi team is already working on the next release. We will not sleep, sleep is for the weak…and that is making us walk around the office like…the undead.
zombies!!Enjoy your Halloween!!
Cheers
SG

These enhancements continue to get better and better, and with this release it's clear that it will only continue becoming better and better thanks to the new customer request portal. Thanks to Parley, Steve, Brian and others at Inview Labs our requests have been listened to and enhanced time and time again!

The following video is how we've logged our plumbing group assemblies and utilized Unifi to enhance our productivity. This allows us to read a set of plans with labels, associated to each plumbing assembly and tied to our database, and allows us to place these assemblies in the prospective locations based on the Master Plumber's direction. You can only imagine how much time this saves compared to the normal route of having to insert a group that's in a list or inserting a group from a specified file location. Instead this hyperlinks our whole process all thanks to UNIFI!

Sign up here today for Unifi!

Thursday, October 15, 2015

Dynamo - RFI Sheet Generator Tool

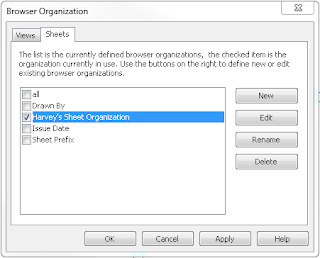
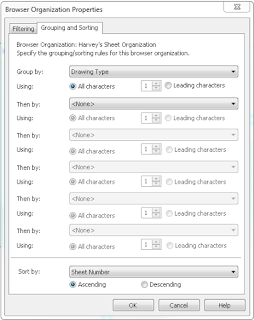
This tool allows us to type in the list of room names that contain plumbing fixtures that need to be specified through an RFI. Through a few simple nodes we're able to generate the sheets, first selecting the title block, and then group them based on their categories. All this data is fueled from the excel spreadsheet. In order for this node to work. You must first right click your sheets category, in the project browser, and set up a browser organization. Our's is called "Harvey's Sheet Organization". From there you can follow the steps below for success! I found an example of this online and cleaned it up a bit for our use in the office. I also modified the layout of the programming to work smoother.

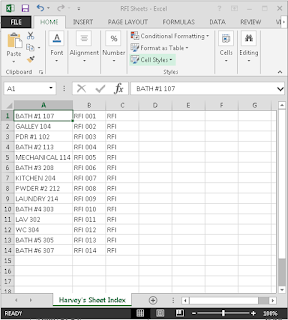
Step One: Format your Excel Sheet (Drawing Name, Drawing Number, and Drawing Type)

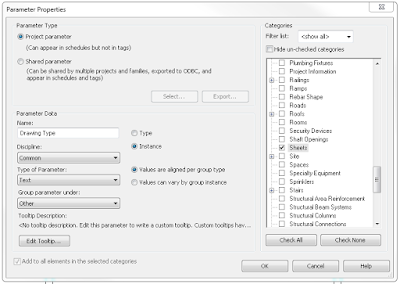
Step Two: Specify your new "Drawing Type" Project Parameter


Step Three: Create a New Browser Organization

Step Three: Ignore Filtering and Specify Group and Sorting to "Drawing Type"
Step Four: Fueled by Excel File (Create the Module)


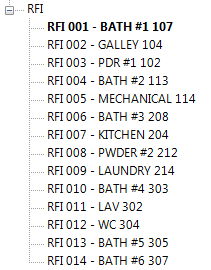
Final Result in Sheet Browser


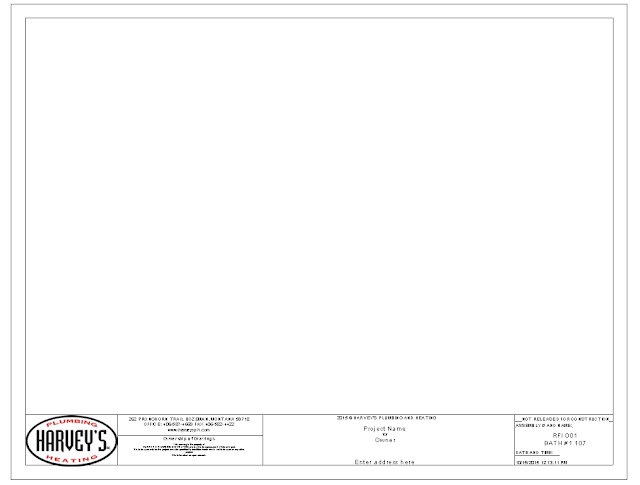
RFI 001 - Bathroom #1 107 Example (Titleblock With Sheet Number and Name filled out.)
The initial example and process that I followed, and refined, can be found here: 

Update: 

Adding placement of callouts for RFI's on sheets:

View Placement. All callouts must be drawn in the order of the Excel Spreadsheet in order for this to work.